 |
It's actually a pottery, and to my surprise, it's still there after all this time. Of course, I had to make a model based upon it...
Yes, I made a few selective alterations, and then blow me, a client who had come to collect some models bought it...I have never been able to resist cold, hard cash, you know. But I went back to sketching over the years while I was engaged in modelling for other folk.
This iteration definitely has a Burton on Trent flavour. I don't know why, but I always thought it should be a brewery.
I almost built this scheme, had the baseboards made and had started to lay track. Then my son was born... cue a large gap in modelling ...and after a while, my daughter followed, both occasions for great joy, but modelling had to stop. When I got back to making things, they had to be for money.
Well, my son is grown up and almost thirty now. How did that happen? I've retired and I think it's about time to start the Penwood project! I love building structures, industrial concerns and stuff like that. I'm not into pretty or romantic things, so a gritty northern town is my cup of tea. Building all those bucolic GWR branch line termini for folks was a kind of torture for me, a penance for my many sins.
For a while, in my trainspotting teens, I lived in Stalybridge. At the time, it was as gritty a place as you could find. There were even steam trains, because this was the 1960s. I could see fourteen mill chimneys from my bedroom window. Now, it looks like anywhere else, sadly, with Primark tin shacks and ticky tack houses- although there are echoes of past glories if you know where to look.
This is one of my most recent sketches, aka mind dump or fever dream...
The trouble is, when I draw something, it's as if I've worked through it. I don't want to do anything else with that. But I knew I still wanted to capture the flavour, all the same. So I hauled out a book by Falcon Hildred from my shelves. He's a very venerable industrial archaeologist and artist who lives near me here in North Wales. Falcon's book is a treasure trove of inspiration, and I found something right away that would start me off on my modelling oddysey...
There was a drawing in Falcon's book of a pub which caught my imagination, reminding me of the landscape I grew up in, long terraces of houses, corner shops and pubs, oh, pubs everywhere, with acid etched windows sporting art nouveau designs.I took the elements that appealed to me the most, as I don't like slavishly copying something. I transferred the design onto a sheet of 2mm greyboard and cut out the window apertures to the size of the windows I had made, and to the size of some bought from York Modelmaking.
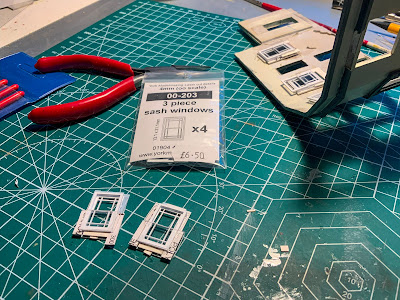
The York modelmaking windows are beautiful and I couldn't wait to install them, they would be the finishing touch, I thought. But for some reason, when I offered them up to the apertures, the windows were too big by a mil or more. How does this happen? I had checked all along. I would say I don't know, but it seems to be a pattern with me...I'm not great with measurements!
So I had to file away at the apertures and try and cut away some of the surrounds. Then I thought, "Oh bugger this!" and I threw it into the bin. I don't have a lot of patience. The next day, Petra, my partner, saw the model and demanded an explanation. After she'd heard me out, she persuaded me to carry on and rescue the flipping thing. She was right, of course, she always is. So I made the window surrounds again and fiddled with the capitals until everything was ticketty-boo.The windows went in and hooray, everything looked good.
Ecxept that it wasn't an easy road out. If you are going to fit glazing as per the protyotype, you need spacers between each sash to accomodate the extra size of the glazing... that was a fiddle, but not impossible. If I'd made the apertures the right size to begin with, there wouldn't have been a problem. It was also tricky to fit the windows behind the aperture, needing at least three hands to do it properly. But this is modelling isn't it? A fight against intractible and reluctant materials, to persuade them to masquerade as something they are not. I shouldn't complain, it comes with the territory.
At last the windows were in, and curtains installed. I painted the frontage in off white, Vallejo 005 and the dark lower sides in Army Painter "Dungeon Grey".
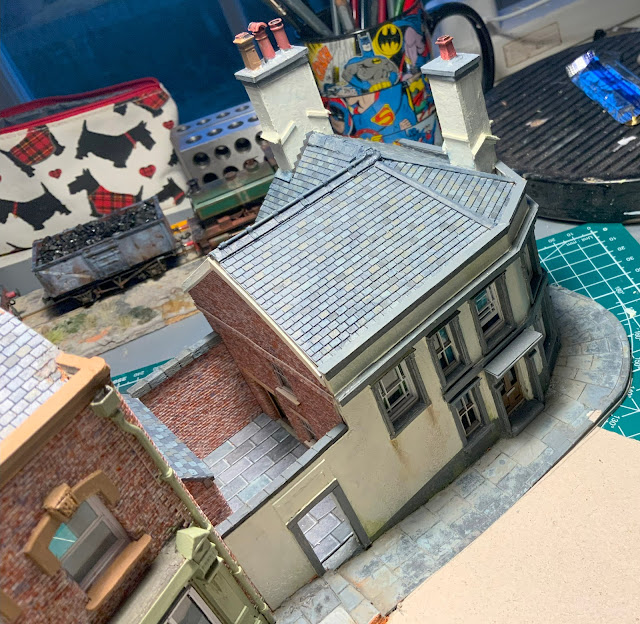
I installed the chimneys from strips of balsa which were ideal and a lot tidier than making up from strips of greyboard as I normally do. They need to be sanded well and sealed with dilute PVA but then they take the paint like a dream. Chimney pots were from Scale link. In the photo above you can also see a building I was working on at the same time, a shop further up the road...more of that in another post.
I know this will amaze you, but until this point, I hadn't considered the roof... I made some templates from thin bristol board and hacked/trimmed away at them until I had a set of formers to work with. Other people can calculate roof dimensions or run them up in a 3D programme. Not me, it has to be the good old bristol board. I'm a bit thick, but I'm happy.
Slates. I've kind of been there and back with this subject as a lot of you will know from my old blog. I started putting them on individually, then in strips, then made out of styrene, cutting with two blades in the knife a la Dave Rowe. Then York modelmaking came to the rescue with their self-adhesive strips of slates, very neat indeed. Except that they can go wrong in my hands, although I have had some triumphs. They are a bit big, though, more like Marchionesses than the Penrhyn ladies that they should be here. So I fell back on Wills (now Peco) Slate sheets. Just the right size and easy to apply. I pasted my templates on the sheets, remembering which way round they went (oh, yes, I had a couple of mistakes there, as I'm sure you can believe...) then it is simply a question of fixing all together and applying flashing etc. Painting was with a chisel brush and a pallette of various grey acrylics. Quite relaxing.
Ridge tiles are made by wrapping paper strips around a styrene rod on a bed of folded bristol board strip... an old method, these days you can buy all sorts of 3D printed ridge tiles.
I made the little courtyard at the back which I will fill with barrels and crates of IPA eventually. Incidentally, the brickwork is by Redutex, a Spanish textured and self-adhesive product that is really for HO, but it represents for me a compromise between the lack of texture of Laser cut brickwork and the lack of relief with brickpaper. I always think that a little exaggeration in texture is necessary in a model, or everything will just look impossibly smooth.
Above is the pub in position with one or two unfinished structures uphill, which I will describe another time. Oh, yes, I need to add downpipes and gutters, thanks for reminding me.These days I use the excellent Modelu 4" 4mm variety, although they still look a little small. Exquisite, but small perhaps. Incidentally, if you have ever tried to straighten out the gutters and been upset when they snapped- if you heat them up in warm water they become far more biddable. Below is a slightly larger photo of the almost finished model. More next time...


Comments
Post a Comment